Add Dynamic Lighting to a Flat Photograph

| 0 comments


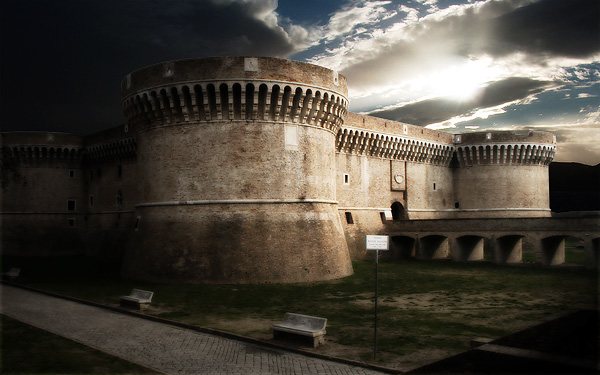
In this tutorial, I will show you how to spice up a fairly dull and flat photograph. It’s very easy and fast! Go from flat photo to a uniquely lit style.

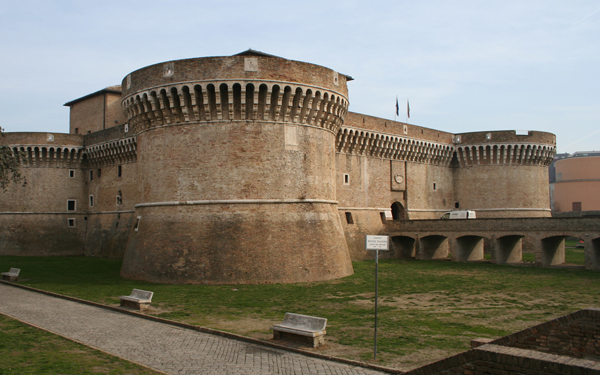
For this tutorial, we’ll need two photos that I took.


Step 1
First of all, my apologies for this step. I waited for a good 20 minutes but that car didn’t move, so I had to take the photo with it!
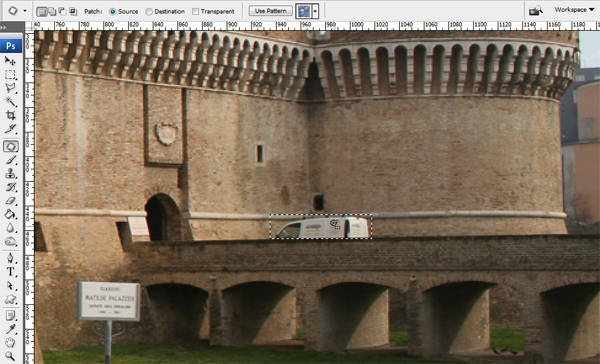
Anyway, just use the Patch Tool (J) to remove the car and the Clone Stamp Tool (S) to recreate the pattern of the bricks where it used to be.
If you’ve never used the Patch Tool, there are a couple of ways to use it. First, make a selection as you would if you were using the Lasso Tool, then click inside the area and drag with your mouse. Depending on whether you are using Source or Destination as your checked option you will either move the image inside the selection, or move the whole selection around. The Patch Tool will blend-in the area you’ve chosen when you let go. You can also use patterns and transparency. All in all, it’s a great tool.

Step 2
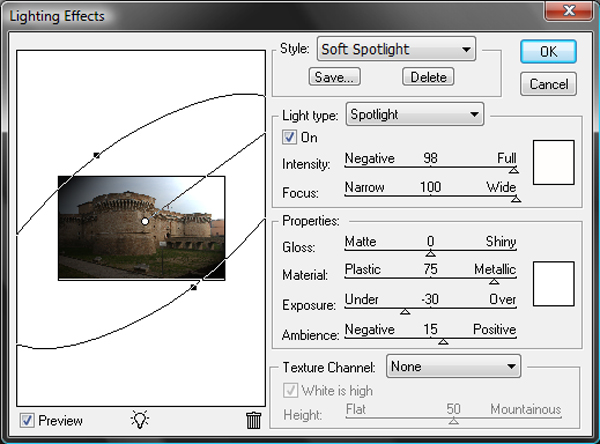
Once the van has been removed, apply Filter > Render > Lighting Effects to make the light come from the top right.

Step 3
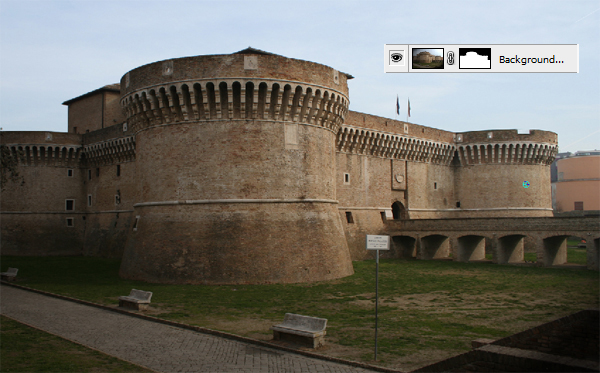
With the tool that you prefer, create a selection of the part that you want to hide. For example, I used the Pen Tool (P) to select the sky and the buildings around the castle. With the selection active, add a Layer Mask.

Step 4
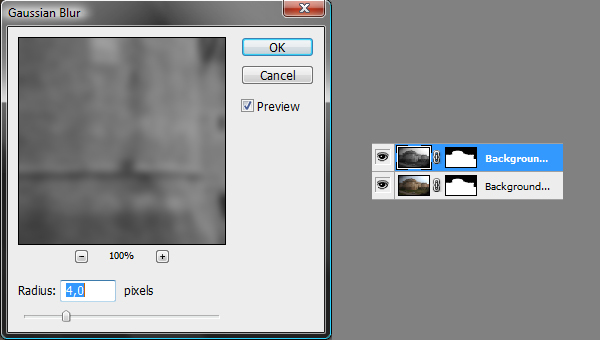
Duplicate the background layer, desaturate it with Ctrl+Shift+U, apply Filter > Blur > Gaussian Blur with 4-pixel Radius, and set the Blending Mode for the layer to Overlay.

Step 5
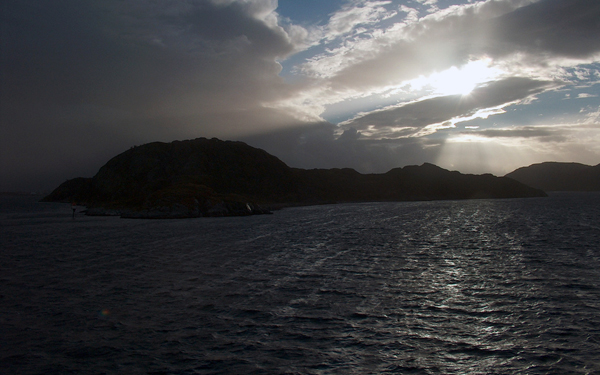
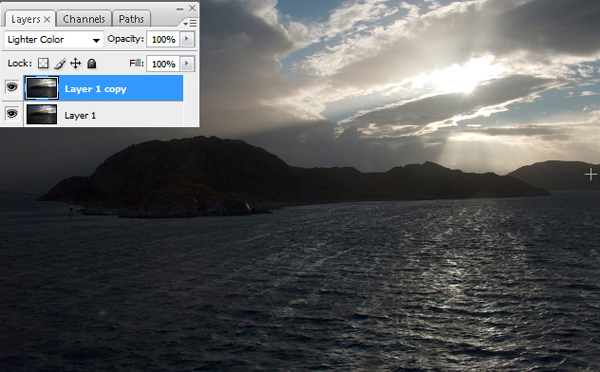
Now we need a photo with clouds and the rays of the sun coming from the right. I used this photo of mine that was perfect for this situation.
Send it to the back of the other layers.
Then duplicate it and set the copy layer Blending Mode to Lighter Color.

Step 6
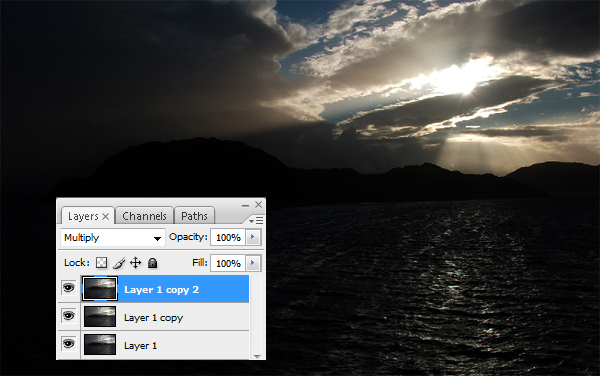
Duplicate again the original background photo (Layer 1) and put the this new layer below the Layer 1 copy.
Set the Blending Mode to Multiply.

Step 7
Now turn off the visibility of the two castle layers, go to the Layer 1 copy, and merge the visible layers into a new layer with Ctrl+Shift+Alt+E.
Then desaturate it with Ctrl+Shift+U, set the Blending Mode to Overlay, and the Opacity to 50%.
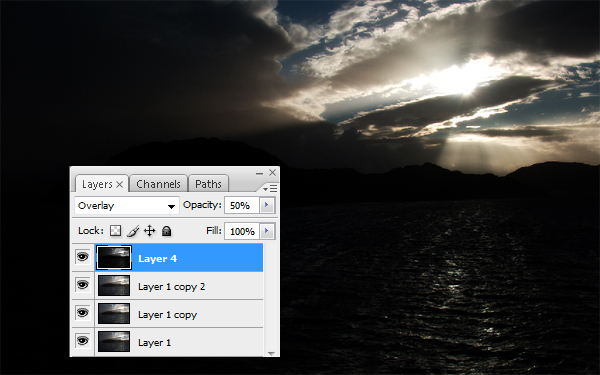

Step 8
Make a new layer on the top of the other.
With a large, white, soft brush that matches the size of the light of the sun, just make a round spot.
Then apply the Luce filter that you can download free or use the previous tutorial about Lighting Through Clouds here on Psdtuts+, to make this light coming through the clouds. Set the Blending Mode to Overlay.
This is an example with black background to demonstrate the effect.


Step 9
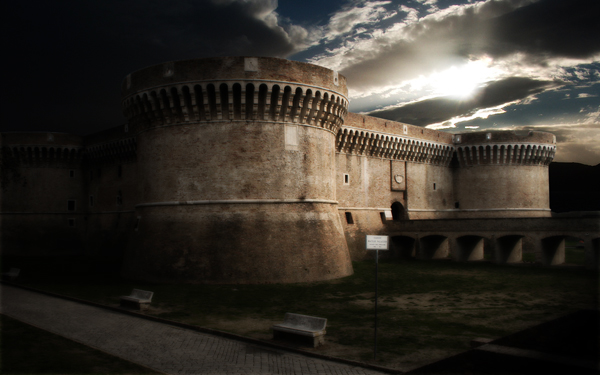
Just Burn the dark side of the castle and Dodge the light part of it with a large, soft brush. By doing this, we make it seem as if the light is coming from the clouds and hitting the right side of the castle, leaving the other side in darkness.
At this point we’re almost done, but the image is overall quite dark and our blur earlier has left it slightly too blurry, so we’ll fix that next.

Step 10
To finish the image, create a new layer above the rest and go to Image > Apply Image, use the settings "Merged", "RGB" and "Normal" for blending. This will create a new layer above the rest holding a copy of the image. Set this layer to Screen and about 70% Opacity. Then go through each layer and apply Filter > Sharpen > Unsharp Mask and use the settings Amount: 250% and Radius .2px (Use a larger radius for larger images). This should sharpen the image back up to give us a good final result.

final image

The Incredible Pen Tool

| 0 comments

By:pandasauure

A lot of tutorials tell you to use the pen tool; this one will show you HOW to use the pen tool. Creating true vector shapes, partial pixel selections, curvature modification, and saved paths are just some of its features.


Step 1
The pen tool has 2 main functions: Shape Layers and Paths. For this tutorial, we'll be using Paths. Select the pen tool and then make sure you have Paths selected as well.


Step 2
Now start by drawing a simple curve. Do this by clicking on some point in the image, then clicking and holding in a different spot. While holding the click, move the mouse some and you will see a curve start to form. Let go of the mouse button when you've got the curve you want.


Step 3
Now you can click again and repeat the process to create another curve. You'll notice that this time the curve was automatic and followed the general direction of the previous curve. I bet you're wondering how you can change that.


Step 4
Let's start over with the first curve. Click somewhere, then click again and drag. Once you get the curve you want, instead of letting go of the mouse button, this time hold down the alt button on your keyboard and move your mouse some. You can dictate which way the next curve will go by doing thi


Step 5
With the line adjusted, this time when we click for the next point the curve will not be the same. The curve always follows this line we just adjusted -- the longer the line the more sharp the curve will be. The direction of the line indicates which way the curve will go.


Step 6
You can also add points after your curve is created. If you hover over the existing path you will see the pen tool with + beside it. If you click the mouse you can add a point, and if you hold down alt you can see how adjusting the line affects curves.


Step 7
If you hover over an existing point, you will see the pen tool with a - beside it. This means if you click it will delete the point you're on. I'll go ahead and delete the anchor point we added in the last step.


Step 8
Now you may be wondering what to do with the path you've created. There are lots of options. To see them, right click anywhere in your image with the pen tool selected.


Step 9
Let's go through each of the options. Delete Path is obvious. It will delete the path you've just created. Define Custom Shape will take the shape you just created, turn it into a true vector, and add it to the pen tool's shape menu so you can use it whenever you like. Make Selection will turn your current path into a selection. This has a major advantage over the marquee tool: the pen tool can select partial pixels while the marquee tool selects only whole pixels. It does this by adding a transparency to existing pixels that are on the edge of your selection. This means your selections will be much smoother.

Step 10
Fill path will fill your path with the options you specify. This includes opacity, blending mode, and a few others. Stroke Path will allow you to choose what tool you want to stroke the path with, and then do so. Finally Free Transform Path will allow you to adjust the scale of your path. Right clicking again will give you even more options such as skew, distort and perspective

Step 11

Let's look closer at the Define Custom Shape option. First make some shape with the pen tool


Step 12
Right click and select Define Custom Shape. It will ask you for a name, just call it whatever you like


Step 13
Your shape is now saved. You can delete the path. To use your shape, select the Custom Shape Tool, then select your shape from the Shape drop down box.


Step 14Now all you have to do is click and drag to re-create the shape any time. Holding down shift will create the shape at the original proportions. Making a shape is great for anything that might become repetitive, or for things that need to be scalable like logos.


Step 15
Let's look at one more very useful function of the pen tool: cutting out images. This is better than using the lasso tool for many reasons. First of all it will select partial pixels as mentioned above. You also have the ability to adjust your path at any time. And moreover, once your image is traced you have the extra option of doing things like creating a shape from the object, or putting a stroke around it.

Step 16
Open up a picture you'd like to cut out and use the pen tool to trace around it. It doesn't have to be perfect because you can adjust it later. Some people even prefer to click on each point or junction and then go back and modify the curves later. Personally I tend to modify the curves as I go -- just do whatever you're more comfortable with. I'm an old-timer StarCraft fan so I'll use something from the game.


Step 17
Now right click and choose Make Selection.


Step 18
Now you can press ctrl-c (or edit>copy) to copy the selection to the clipboard. Create a new image and paste the selection with ctrl-v (or edit>paste). Now you can do whatever you want with the background layer and your image should look good because of the partial pixel selections. I used the horribly ugly rainbow gradient just to show you how the partial pixel selecting automatically blends the edges into the background no matter what color it is.


Step 19

The pen tool admittedly takes more time than some other tools -- both to learn and to cut out images. However when it's quality that counts, it's the pen tool hands down. Learn it, live it, love it.

Step 20
Just for grins let's go back into the original image where you created the path. Click on the Paths palette (by default it is in between Layers and Channels). You will see the path you created. Click on it and it should appear again.


Step 21
Now you can right click (with the pen tool selected, of course) and choose Define Custom Shape. Now I have my own Protoss shape to use whenever, and however I like -- even to create my own terrible protoss army, a silhouette of fear stalking in the night MWAHAHA!


HOPE YOU LIKE IT
THIS IS A SIMPLE TUTORIAL

Beginners' Guide to Adobe Photoshop

| 0 comments

By:pandasauure


This basic, thirty-minute tutorial is not a comprehensive instruction manual. It only teaches you the few simple features you need to know, to start using Adobe Photoshop. From there, you'll quickly discover most of the other features of the program yourself.


1 – Creating a New Image, and Setting Adobe Photoshop's Undo Option
Click File > New, and create a new image of any size you desire.

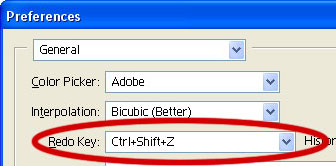
Press Ctrl+K to bring up the Preferences window.

Change your "Redo Key" to Ctrl+Shift+Z. This enables you to press Ctrl+Z at any time, to undo the last thing(s) you did. Remember this.


2 – Using Adobe Photoshop's Layers window
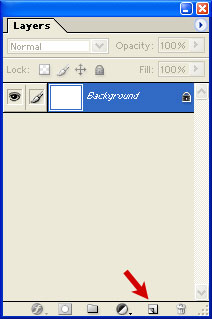
The Layers window shows the various layers that your image is made up of.

To make a new layer, click the New Layer button, as shown by the red arrow.

To work on a different layer, click on that layer. The eyeball will apear next to that layer.

You can drag layers up and down the list.

Remember – create a new layer for each part of your image. This allows you to go back and edit the layers individually. Every Adobe Photoshop beginner at some time makes a masterpiece, only to find out that they did it all on one layer, and now they can't remove those pink clouds they put on it. 


3 – Learning about Selection
One of the most important concepts in Adobe Photoshop is Selection.

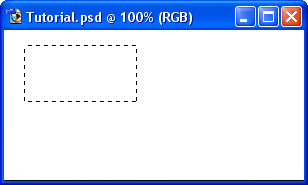
This is the Rectangular Selection Tool.

Use this tool on your image to select an area of the image. This lets Photoshop know that that's the area you want to work on.


4 – Adding to a Selection and making a square
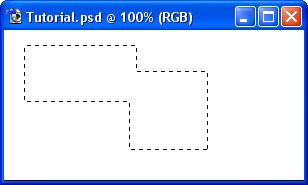
To add to a selection, hold Shift before dragging.

Tomake the selection exactly square, start dragging, then hold Shift.

You can press Ctrl+D to "deselect" and remove the selection at any time.


5 – Elliptical Selections and subtracting Selections
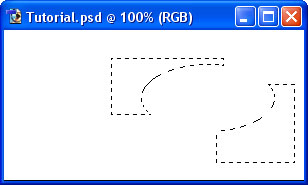
Hold down on the Selection Tool on the Toolbar, and choose the Ellipse.

To move the selection, just click inside it and drag.

Holding Alt while selecting subtracts that area from the selection. I've done that with the Ellipse Selection Tool.


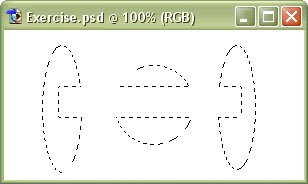
6 – A Selection exercise
If you're following this tutorial in Adobe Photoshop, see if you can make these shapes.

Other relevant Adobe Photoshop tools
Lasso Tool – Allows you to draw a selection area with the cursor.
Magic Wand – Summons elves. (Also believed to select an area of one colour.) :P


7 – Choosing a colour
Now that you know how to select an area in Adobe Photoshop, we can look at some tools that can do something with that area.

Before we get started on colouring your selection, you'll need to pick a colour.

This part of the Toolbox is where you select your colours.

The top square is the foreground colour. If you use a brush or paint bucket, it will apply this colour.

The bottom square is the background colour. It has various purposes, but it's also a good place to store a second colour that you're using.

Click on either square to change its colour.
Click the arrow to swap the two colours.
Click the little squares to reset the colours to black and white.


8 – The Paint Bucket and Gradient tools
These two tools share a button on the toolbar. To select one, click and hold.

On a new layer, just click the Paint Bucket tool inside the area of your selection to fill it with the colour you've selected.


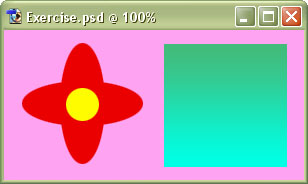
9 – A colour exercise
With what you've learned so far, you should be able to recreate this piece of hippy history. 

Remember to create each step on a new layer.

Other Adobe Photoshop tools of interest includeThe Text Tool – Just click it wherever you want text to appear. Choose a font, colour, and size, and start typing.
The Move Tool – Use this tool to drag things around. If you have a selection, it will drag the contents of the selection. If not, it will drag the contents of the layer you're on. 

What If Cannabis Cured Cancer (2010)

| 0 comments

Faces of Death

| 0 comments


A collection of death scenes, ranging from TV-material to home-made super-8 movies The common factor is death by some means.
Download:
http://www.mediafire.com/?nlv1482rz7h3x
Password: taringa.net/perfil/BL0OD

National Geographic: Dangerous Encounters Wild West (2010)

| 0 comments


Brady Barr saddles up and ventures into America's Wild West in search of the region's roughest and toughest creatures. He'll partner with conservationists to track and collar the elusive puma, narrowly escape the venomous bite of a western diamondback rattlesnake, come face-to-face with a bison and research the migration habits of the iconic golden eagle, and its giant talons!
DOWNLOAD LINKS:
http://www.mediafire.com/download.php?2518djxkkzhrikq
http://www.mediafire.com/download.php?q7h7aocq0j5adlr
http://www.mediafire.com/download.php?1b4xf2p2y95v3vm
http://www.mediafire.com/download.php?x2s7ho2hoi3519t 

National Geographic: Into The Lost Crystal Caves (2010)

| 0 comments


NGC goes inside one of the greatest natural marvels on the planet - a giant crystal cave described as Superman's fortress, with magnificent crystals up to 36 feet long and weighing 55 tons. A team of experts venture into the cavern, enduring scorching-hot temperatures that could kill a human after just 15 minutes of exposure. They'll push the boundaries of physical limitation to explore a crevasse that could lead to another - and perhaps more spectacular - crystal cave.
DOWNLOAD LINKS:
DVDrip
http://www.mediafire.com/download.php?40e8vtycz628ode
http://www.mediafire.com/download.php?uk0d22f6v848s62
http://www.mediafire.com/download.php?dv75cnjlt9dvlgx
http://www.mediafire.com/download.php?mc5j9oqp85awwa7 
 
Support : Arnold Merch | Facebook Page | Strings and Harmony
Copyright © 2012. Your Stations - All Rights Reserved
Template Modify by Creating Website
Proudly powered by Blogger